|
Custom Show Print Add-in for
PowerPoint 97 or later Version 1.7.1 |
|
|
Features:
Installation Instructions:
-
Download
 the
add-in setup file. the
add-in setup file.
-
Launch PowerPoint. Click on the Tools Menu and select
Add-ins.
-
Click on Add New... and locate 'CustomPrint.ppa'.
Click on OK.
-
You should now be able to see the add-in listed in the
window with a 'x' mark against it. Click on OK again
-
If it prompts you with the Macro Warning, enable the
macros.
Note: Fixed a bug in Version
1.7.0 which printed everything to a file. |
|
How to use Custom Show Print Add-in |
|
|
-
If the add-in is loaded, it adds a menu item in the
Tools Menu. Look for 'Print Custom Show...'
-
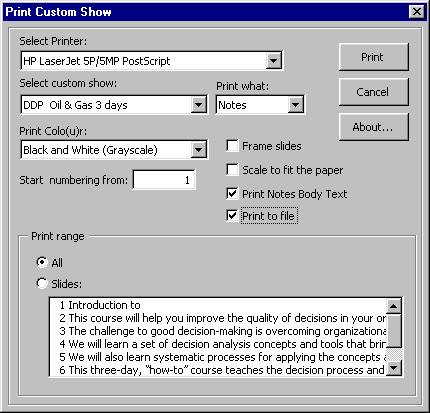
Click on it. This will bring up the window shown
below:

-
Select the custom show to print from the list
provided.
-
Select whether you want to print the the Slides or
Notes.
-
Page numbering will begin from the value you specify
in the 'Start numbering from' field.
-
Specify the print range. If you desire to print
specific page(s) then select the Slides option and then click
on the titles of all the slides you want to print. Click on a
selected title again to unselect it.
-
The default printer is selected. Change it to an
appropriate one if required
-
Specify output settings like - Colo(u)r, frame, fit
to page etc.
-
If you want to hide the Notes text body while
printing, uncheck the 'Print Notes Body Text' choice.
-
Click on Print.
|
|

|